Sunday, October 7, 2012

UFO 6 & 7 Halloween UFOS, Eagle in simmer

Hi, my name is Laura and I have been silent.  My UFOS however, have been very noisey.  I just started a full time job two weeks ago, and that has cut into my quilting time drastically.  The job is great, but now I find myself in a constant time crunch and the demand for attention from the house chores, etc has been a challenge.

However, I still have the Eagle perculating.  I had asked the question about trapunto under the applique, which Leah Day was kind enough to respond too.  I had thought to trapunto the blue body as a whole.  But that means no definition in the middlle of quilt, just fluff.  So now I have a new idea simmering, while I make a date to get to the local quilt shop during lunch one day to get the thread to start quilting the trapunto outline.  

What if I pick random feathers to trapunto?  A few tail feathers, maybe three per side, and one between the legs.  A select bunch inside the blue body, to ennuciate the different dark blues I used.  And then maybe a few select wing feathers? I'm thinking of doing individual blocks for the body and tail, and maybe the whole strip for the length of the wing... This is getting more complicated as I think and simmer.  hmm, and maybe the beak?


So what have I actually been working on?  Oh - did anyone else notice its OCTOBER!  I promised my girls some costumes... yikes!


1st graders Tangled costume. - 1/3 done
There is the skirt right sides inside with over skirt, and I'm working on pulling the basting thread on the waist line to gather the two layers small enough to pin to the bodice.  I have the bodice in the middle (right sides together) pinned to match seam lines on all three peices.  Gah!  Now to pull those threads - carefully now.   When I get this done I have a whole sceen of yarn to braid into the hair piece.

Good news - 3 yr old boy will be spiderman, bought off the shelf at Walmart - just have to hem pants and sleeves.  15 minutes tops - if he chooses to hold still.

2nd grader - royal princess - not started.  She wants the lower right, purple for her.
 
But for the best and easiest project - add some monster eyes to your house this Halloween.  One black trashbag per window, slit open to fit your window.  Cut out eye hole, cover hole in tissue paper iris and white paper eyeball.  And then fold carefully and reuse next year.  You need good light in the room to get the spooky effect.   Here was todays five minute decorating for this room.  Glare is from street lamp.


Happy Sewing, Quilting or decorating,
Laura


Sunday, September 23, 2012

UFO Sunday #5, Eagle Trapunto Update

I had a little happy dance when I got the box with all the goodies from http://www.daystyledesigns.com/quiltshop.htm,   including the water soluble thread for the Trapunto layer of the Eagle quilt.

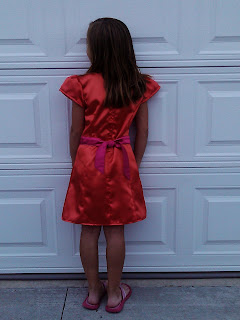
But first, I had to finish off daughter #2 dress.  A project promised and started while I was in some down time waiting for the thread.  Here she is, my 1st grader.  Some minor adjustments to her size are needed, my petite girl needs the straps taken in at the back, but that is a quick fix.


Now to the Eagle Trapunto update. I had the eagle up on the hangers and I showed my husband the design. He looked at it, cocked his head sideways, stood back and then started rearranging the glad press n seal.  So glad this stuff is so flexible.  He pointed out the stripes should be wide at the star ( huh, ok ).  Here is his design.


So then, after fixing the direction of the stripes, I thought it still needed some work on the design.  The picture above didn't show the motion, or flow I wanted to feel.  Below is the star burst effect in one corner that I came up with.  Again, without the flexibility of Glad press n seal, these changes would of taking more time.


I was thinking in some down time that my trapunto design is very open, and I wondered if I could save batting, for other projects by measuring out pieces to fit the stars and stripes. I did this and then saved half of the Single size batting I was using.


You have to be careful pinning these sections.  Sometimes the corners would overlap another piece and I would trim the overlap away so it stayed at one layer.


So here is the back after the first layer


In this next picture I put the layers together and then ironed around the trapunto to make it stand out better for the photo.  I have not sewn the layers together.  


Question:  Should I try to trapunto the blue body of the eagle? I'm worried that the weight of the applique will negate any extra batting I add.


That is it for this week  I have just been hired for a full time job, and going to attend a conference in Atlanta this next week.  So I'll continue to work on the Eagle and post updates on Sunday - it just won't be such big jumps of progress.

Laura

Sunday, September 16, 2012

UFO Sunday #4 Update

I took a break from the Eagle this week.  I ordered water soluble thread and so many other goodies from The Free Motion Quilt - online store.  And I found it in the mail box yesterday. So next week will be focused on the trapunto layer of the Eagle.  YEAH!

However, this week was about simmering ideas about the fill design on the eagle....  and

1.  My #1 daughter (2nd grader) came to me several weeks ago with a drawing and asked me if I could make her a dress.  A trip to the fabric store and an hour in the sewing patterns resulted in dress patterns for both girls (#2 daughter in 1st grade).   So this week was about getting as much done on these two dresses as possible.


Here is the pattern.  She choose the long pink dress with the cap sleeves.  We made a few modifications.  First we cut the dress at the size 12 length on the bottom, instead of the size 8 she is.  Then we eliminated the dropped ruffle skirt look.  #1 daughter also had drawn a pink belt on her orange dress, so we made that up from scratch, with 45 degree ends, like a ribbon.  No jacket.

Front view


Back view


2.  Here is #2 daughters dress. She chose the blue "fairy dress" on the pattern picture.


Here is the top with two layered ruffle sleeves on shoulder strap, with lining.  It is complete.  I am now working on the skirt and underslip with ruffle today, then zipper and I'll update with fashion show photos when its complete.


Both of these projects used costume satin which is slippery stuff!!  Pinned these pieces every two inches to keep them firmly in place.  But these Simplicity patterns were a good warm up for Halloween.  Girls have picked out Princess costumes, so I have added two more UFO projects in the ASAP column of my list!

But, I have also removed a few things from the UFO list too!

1.  I thought this summer, after the move, that I would recover a few pieces that needed desperate TLC.  I have pair of library chairs from my grandparents that needed to be updated.  Here is before and after:


I also had the following chair and ottoman on my list, but after sending photos to my Aunt, who taught upholstery and had her own business - this is now going to be a outsourced project.  So this is off the list!


Looking forward to Trapunto-ing the Eagle over this next week!

Laura

Sunday, September 9, 2012

UFO to WIP: Eagle - Trapunto Plan - GOT IT

I have the Trapunto (stuffed quilt technique) design for the Eagle!!!


After a question and comment on my previous post, about the trapunto swirl around the star... I started brainstorming.  The question was whether I wanted more of a military emphasis on the design, or maybe the better option was rays of sunlight.  I started looking at images.  Here are a few that caught my eye.


I liked the pinwheel look and the softer curve.

I liked the flag behind the Eagle, but planned to do a monotone background.  I could not see how to get the wiggle in the flag, or the colors to represent themselves, so that  the motif would stand alone without explanation.

I liked the star burst effect and how the stars were randomly placed.


After the kids were in bed tonight, I went downstairs to the basement and started with completing the "Swirl around star" motif. I would either convince myself yeah/or nay with the final look.  So here is the Glad press and seal in the "Swirl around star".


I took two pictures to get the detail to show better.  You can see I did not have room for that same motif above the Eagles shoulders and head.  So I made some softer curves - more like the pinwheels in the above brainstorming.   I still didn't like the tight "swirl around star".  The Eagle is supposed to be in flight, and that seemed like a lot of turbulence.  And although this whole project has had turbulence - hence the status of UFO since 2004!, I didn't need to add that feeling into the final quilt.  I did like the "stars with tails" at the top.

Wait, I liked something!  This has been a week of wondering if the light bulb would go off and a smiley face emoticon would magically appear on my blog.  :)  HA!  The wall of confusion has been demolished.

So I just spent the last hour tracing out "stars and tails" on Glad press and seal.  Then I peeled off the swirls with a sigh of relief.


 Here is my subliminal take on stars and stripes - my way....


A little bit of pinwheel swirl in the tails, stars and stripes are spaced throughout, and I like the movement it conveys.

Phew!  What do you think?  Which over the shoulder design do you like?
A.  Top photo, tails are together, twisted up and twisted down
B.  Bottom photo, tails follow stars from corners to center

Need to find water soluble thread, or order - ready to Trapunto!
Laura

UFO to WIP: Eagle - Quilting plan, take #2

Here is where I am at the moment on the Eagle.  Not entirely happy with the look, and not sure where to go next.

I tried my Trapunto (stuffed quilting spaces), on the small star and then horribly micro stippled around to get the feel for the puffiness of the batting.

Here is my start: stitched to one layer of batting and top fabric (looking at batting)


Right side up - outline of star 


Trimmed the excess batting from around star, using kids blunt tip safety scissors.


Picture below shows puffiness of one layer of batting.  Shiny reflection is Glad Press n Seal plastic wrap.  Open it up on hard surface (kitchen table) and use stencils or cookie cutters or whatever you have to draw out design.  Then stick it to surface of quilt.  Works like paper piecing - will come right up after you sew outline.  However, I forgot to pull it up for stippling and it made a mess. Guess that is another reason why its a test!!


Overview of yucky stippling and nice puffy trapunto star.


Here is an idea I had for quilting the tail feathers of the Eagle.  I need tons of travel stitching practice to work on before quilting this top.  I feel another couple of table runners to practice on are next in the FMQ (free motion quilting) list of things to do.  Maybe I'll do a turkey with feathers of same size to practice??


I live in military housing, and as such can not "improve" the unfinished basement.  So to hide the storage area, my husband hung up copper pipes with 550 cord for me (through the rafters).  The pipes hold some fabric shower curtains.  This rig is recycled from the last house where the pipes and curtains were used on our covered back porch for privacy and shade.  But here, they screen off the storage section of the basement.  And another use??  Why not!  Using skirt "clip hangers" close together, I have the Eagle hanging up on those same copper pipes.  It helps to get her off the floor and see what I am doing from a distance.


You will notice in the above picture that I have Glad Seal n Wrap stuck to the Eagle in the lower corners, with tracing of my current trapunto idea.  Here is a close up of those tracings, one swirl left and one in reverse.


Close up on Eagle of tracings...  about 80%  happy with this pattern.  I either need to shrink it to fit over the shoulders of the Eagle ....... or......  use only stars?  Maybe two at wing tips and one each over each shoulder to make it a complete design??  Or go back toward the idea of bunting with softer swirls (no edgy points), maybe in three echos.  I like the size of the stars, and the rest I am unsure of.


Oh, and lastly...  The idea of thread painting around the Eagle head to better transition from white and gold head feathers into his blue body feathers.  Below is my first ever try of that technique...


Real colors would be to start on the inside with white, then tan and then gold (instead of red seen here).  Another new technique.  I need to piece a few eagle head blocks together and practice that again to see what it looks like over a pieced section.

Thursday, September 6, 2012

UFO to WIP : Eagle - Quilting plan

UFO (UnFinished Object) to WIP (Work In Progress) : Eagle

She is flying!  The Top is done.  See previous UFO #1 Eagle Post to see her story of struggle, from stuck to strutting her stuff.  I moved, and got a new machine for my birthday this summer and with a new corner to call my own, I'm up and quilting.

Things I've tried new so far in previous post:

  • applique of Eagle
  • satin stitching Eagle
  • Embroidery of name

This post however is the story of her quilting.  I have never quilted out of the ditch, except on small table runners (see projects #1 and #2 on blog).  This Eagle is a challenge and a great learning experience all in one.  Here she is in color.


These are the new things I am learning this week, trying for the first time:

1. Auditioning quilting patterns on black and white copy of Eagle.  I took a color photo, changed it to black and white on the computer and printed off several copies.  I then thought about saving trees and space and found some left over plastic page protectors.  Slid the black and white image in the page protector, and found a wet erase pen.  Dry erase always ends up on my hands, so wet erase is what I used to make the following "auditions".  Here is Leah Days blog on auditioning quilting designs:   http://freemotionquilting.blogspot.com/2012/08/quilt-along-28-auditioning-designs.html


Above is black and white image.  Below is Audition #1, sun rays radiating from behind the Eagle...


Second audition, after looking at google images of trapunto, and seeing a star puffed out...  Audition #2 A take on patriotic bunting... Page protector only in this photo.


Slid black and white Eagle image back in page protector in this image.


Overview of patriotic bunting audition with black and white image on left, page protector and wet erase pen.


2. I am designing a trapunto effect into this quilt.  I have never done this before and I have a mock up of a star pattern that I want puffy, and a swirl that I want puffy.  I am just going to micro stipple the surrounding areas.  I think this will look better than the patriotic bunting, auditioned above as option #2, but have a similar hint of patriotic flair.  Bunting seemed too busy, strict, and didn't allow the eye to flow easily to the Eagle.  Here is Leah Days blog on trapunto :  http://freemotionquilting.blogspot.com/2010/03/adding-trapunto.html  Another video I lucked into, Patsy Thompsons trapunto on quilting gallery.com.  I couldn't find these videos on Patsy's own blog http://www.patsythompsondesigns.com/  so go here instead!!! :  http://quiltinggallery.com/2008/11/09/abcs-of-trapunto/


3. Testing sample sandwiches of quilting material and batting to try these techniques out before using on Eagle.  Let me be brutally honest.  After 10 years of stitching in the ditch I am very aware of how many things I need to reach out and try.  And the above may seem intimidating (to me), so testing out techniques and pattern seems to be the best way to get myself ready and trained to do my Eagle.  At this point, the last thing I want to do is be unhappy with the final quilt.  Tops have always been my favorite, but now it is time to push the boundaries to become a more well rounded quilter.

The gold sandwich below is the first layer of batting I will use, and it is the same gold fabric from the top of the Eagle.  I am planning on stitching that star, cutting out the excess batting around it, adding the second layer of batting and then micro stippling in the circle to get experience.  I'm wondering "what happens? how does it look? will it look as cool as I think?"
.  


P.S.
I am thinking of doing some thread art around the head to lead the white head feathers into the navy body feathers, using white, tan and gold thread...  next blog, more to think on.  Will that look ok on a piece that I wouldn't consider an "art" piece, but a pieced top?  How many new techniques are too many for one quilt??

Here we go!
Laura