My video library consists of my favorite You Tube Videos:
I am not an expert at quilting, and have never made a "show" quilt. It is however on the list of things to do in the future. For now, my goal is to learn free motion quilting, and along the way learn new techniques and gain knowledge anyway I can. I have taken two quilt classes, and have had 12+ years of stitching in the ditch. It is time to expand my knowledge, and with a new machine and some time, I'll get there. I will add to these as I go, so I can find them again. Help yourself to my "video" library...
Here are some helpful places I've found for learning different techniques:
Applique - Satin Stitch http://www.youtube.com/watch?v=9efLUOdIoCY&feature=related I found this to be a great applique video, covers how to go around corners, etc. However, I found in another video the idea of starting and ending with a straight stitch to lock the thread in place. Once I started doing that, my Satin stitch stayed tight on the ends. To Start: go forward and reverse the same number of stitches and then start with satin stitching. Satin stitching will cover up your starting stitches. To end in reverse, change your stitch style to straight stitch on your machine, and then after the needle moves back to the middle, make sure to lift your foot and slide your fabric so the needle straight stitch will line up with the outside edge of your satin stitching. If you forget.. you end up with dimples going back through your pretty satin stitching.
Free Motion Quilting: http://freemotionquilting.blogspot.com/ Leah Day is amazing, and has 365 free motion designs from her first blog project online in you tubes. All nicely sorted by style or by experience level. Each design has its own video. So much more to see. My favorite place so far.
Mitered Corners http://www.youtube.com/watch?v=uUh7MbELkXs&feature=fvwrel
Friday, August 31, 2012
Thursday, August 30, 2012
Quilting from a closet, getting organized
We are a military family, and move every two years. I have visions of a retirement house with a full walk out basement where my quilt studio will have spacious square footage, plenty of room for storage, and a great big window for natural light, and great task lighting for those work stations. AND Electrical outlets everywhere. Reality is a whole different world. We have moved 10+ times and every house has been different. The only thing that stays true - there has always been a closet I can steel for myself. Jr has never had use of his bedroom closet, until we gained a basement this summer with this move. Now I have some wiggle room, but can't go crazy because.. there is always another move - and a weight allowance for our household goods that we have to stay under! lol!
Leah Day on http://freemotionquilting.blogspot.com/ has great tips and suggestions on this "Thursdays Question" post, about tables for sewing machines, and several blogs on material storage, organizing space, etc. I can totally dream of using those insights in several more years. But today, I have limited space.
So how can you organize to get the best space use, out of a tiny place? Even a closet?
I have several quick and cheap ways to make the most of your closet.
1. Photo Boxes for project organization:
Do you have projects where material scraps and remaining yardage need to be put away quick (for say those holiday guests arriving)? I have a collection of photo boxes. They are labeled on the front tag as to the title of the quilt. Or in some cases by theme, example "Autumn". If I didn't organize my UFO (unfinished objects) or WIP (works in progress) patterns and material in this way, I would have to look through a pile of stash every time I wanted to get started, or worse, a random plastic shopping bag from the last trip for fabric. My Eagle UFO (see EAGLE Post) has a box, thank goodness! I was able to open the box and pull out the exact material I needed, see the original sketches and plan idea, and this box was started in 2004! These boxes are easy to stack and you can usually go three or four high on the closet shelf. And they can't get too heavy, so they are easy to get down.

Here is my Eagle photo box full of the material I originally purchased for this project. And below you can see my collection of photo boxes, all labeled and stack-able. Easy to get too. Yes, I now have a basement, and chose to purchase this stainless steel shelf to hold the pounds of supplies. But these boxes are perfect for that shelf closet - that is where they have lived for the majority of their life.


How do I only have three colors x 2 totes = 6 color piles?
First tote: Red / Pink / Yellows, White, Oranges, Cream.
Second tote: Greens / Purples, Brown and Black / Blue.
5. Batting and fluffy stuff
I have one giant tote that holds the batting, poly-fil, and anything else fluffy or light. Rolls of fusible webbing, stabilizer, etc will also fit in this box.

6. Designate one side of the closet for stacking. You can see the colors if you use clear totes. The totes can get heavy, but they are waist level in this photo, and I can get to both stash totes easily.


Leah Day on http://freemotionquilting.blogspot.com/ has great tips and suggestions on this "Thursdays Question" post, about tables for sewing machines, and several blogs on material storage, organizing space, etc. I can totally dream of using those insights in several more years. But today, I have limited space.
So how can you organize to get the best space use, out of a tiny place? Even a closet?
I have several quick and cheap ways to make the most of your closet.
1. Photo Boxes for project organization:
Do you have projects where material scraps and remaining yardage need to be put away quick (for say those holiday guests arriving)? I have a collection of photo boxes. They are labeled on the front tag as to the title of the quilt. Or in some cases by theme, example "Autumn". If I didn't organize my UFO (unfinished objects) or WIP (works in progress) patterns and material in this way, I would have to look through a pile of stash every time I wanted to get started, or worse, a random plastic shopping bag from the last trip for fabric. My Eagle UFO (see EAGLE Post) has a box, thank goodness! I was able to open the box and pull out the exact material I needed, see the original sketches and plan idea, and this box was started in 2004! These boxes are easy to stack and you can usually go three or four high on the closet shelf. And they can't get too heavy, so they are easy to get down.

Here is my Eagle photo box full of the material I originally purchased for this project. And below you can see my collection of photo boxes, all labeled and stack-able. Easy to get too. Yes, I now have a basement, and chose to purchase this stainless steel shelf to hold the pounds of supplies. But these boxes are perfect for that shelf closet - that is where they have lived for the majority of their life.

2. Shelves in end of closet space.
Do you have a wide closet and deep ends, that extend more than a couple of inches past the door jamb? If so put that hard to reach space to the best use. Find the studs, mark the space for some end shelves. Use the metal shelving brackets (closet section on home improvement store) if you want them adjustable. Measure the depth of the closet for the width of your shelves, and cut some plywood to match. Sand and Paint and you have a small shelving unit.
3. Quilting library
I have my favorite magazines and quilt books in plastic magazine holders. There are three clear and one black on the third shelf in the above photo. I prefer the clear so you can see the sides of the books better. All the spines are out and its the best way to get organized for that growing library on your new shelves!
4. Fabric stash
I do not have a large stash, but overtime you do build up large (1/3 yard or more? you make the call) material cuts, left over from previous projects that you want to store with the rest of your stash. Those cuts are big enough to support a new project, and you never know when you might need them. So... I have two storage bins for fabric. I have my material folded in such a way that I can get three different stacks of fabric in each tote. Before we moved, I had the girls each organize a tote (things get mixed up and its worth the effort to rummage through every once in a while). Stacks for three different colors, and from light to dark. Girls had a blast. I was rainbow organized again!

First tote: Red / Pink / Yellows, White, Oranges, Cream.
Second tote: Greens / Purples, Brown and Black / Blue.
5. Batting and fluffy stuff
I have one giant tote that holds the batting, poly-fil, and anything else fluffy or light. Rolls of fusible webbing, stabilizer, etc will also fit in this box.

6. Designate one side of the closet for stacking. You can see the colors if you use clear totes. The totes can get heavy, but they are waist level in this photo, and I can get to both stash totes easily.

7. Designate the other side of the closet for hanging. There is always that quilt top or back you just ironed, that needs to be hung. Also, small quilts waiting to be bound can hang, etc. Here I have a picture of an adjustable shower curtain rod hanging underneath the stair space. But in the closet space I used a extended hanging bar, that hung from the regular closet bar. This doubles your hanging space!

Finally, if you use the room your closet is in for your sewing, hang the iron and ironing board on the inside of the door using one of these wonderful caddys!
And there you have it, a quilting closet. A lot can fit in a small space, I've done it! So can you. Good luck!
Laura
Monday, August 27, 2012
Project #2 on new machine is finished! Thanksgiving Pilgrim table runner.
Patrick Loses' pattern "Pilgrim Pals" can be found on p.69 in the Fall 2012 edition of the Fons & Porter's Quilting Celebrations magazine. You might also find it online at QuiltingCelebrations.com
As someone who has taken a grand total of one class using fusible web, and having never used satin stitching, until the new sewing machine appeared... I'd classify this as a great beginner project!

In the photo above I have the basic top put together, with pilgrims fused into place.
LESSON LEARNED: Make sure when you are layering fabric (especially light on top of dark) that the lighter fabric is not thin. In this next photo, a close up of the girls face shows where her lighter hat does not conceal the bottom layer of either dark brown border, or her red hair. I actually had to fuse a second layer of white for collars and her bonnet to get it to look right, but now it is stiff.

The photo below shows her now "fixed" and showing my first satin stitching. I did use stabilizer under the leaves, but apparently maybe a iron on would of worked better to control the fabric stretching. More research to do.

Here is the close up on free motion quilting. Again, I went to Leah Days website www.daystyledesigns.com for inspiration. I found a wind pattern I liked, but it was an intermediate/advanced free motion quilt design. I also found several leaf motifs. So I combined the ideas to make the wind swirl in between my leaves - beginner simplified!!

And finally the big reveal...Mr. Pilgrim

Ms. Pilgrim

And don't leaf (pun intended) out the fun in the binding - a new fancy stitch from my new machine... a swirly vine with leaves.

Thankful for many things,
Laura
Sunday, August 26, 2012
UFO #1 - Eagle and her Story
(UFO means UnFinished Objects)
31 August, 19:16 (7:16PM) UPDATE
I finished the top! Here is the Eagle in all her glory. She is on my unfinished basement floor. She measures 39.25 " tall and 66.5" wide. I have never had a wall hanging close to this size, and would love some advice. Will a normal tube pocket do? I have curtain weights I can baste on the back when its complete to make the lower corners hang right, if needed. Has anyone used that idea before?


To see the story of this project from the beginning see below.
Sincerely satisfied for this weeks progress,
Laura


I pulled out a light creamy gold for the background, a striped fabric that has golds and metallic glints through out with a black edge to mimic the black framing and gold matting effect. I'm playing with the idea of trying to embroider the Name on the gold fabric. Then the cross stitch with an added "established" year would stand alone in a frame somewhere else.

Originally I was going to add a black button for the eyeball. Here is a closeup of head detail, sans button.


I ironed fusible webbing to thin cotton batting, then fused that to the wrong side of the talons gold fabric. I need one more layer of fusing, between the bottom side of batting and the center of the quilt. I cut an extended leg "tab" in the gold fabric when I trimmed the talons from the gold. This will slide under the pieced legs and help the transition from puffy to pieced. I hope!
And finally I cut out a smaller border for the EMBROIDERED Name!! I designed the embroidery and then challenged my daughter to get her spelling homework done before the machine finished the 10,000+ stitches. My girl is good, she did it (I never had a doubt)! I matched the background fabric and I think it looks better than the cross stitch for this project. I'll miter these corners too, and then fuse it to background under talons.

Excited about what I can get done before next Sundays update on Leah Days, UFO project at Daystyledesign.blogspot.com
Its so freeing to have a plan again!
Laura
31 August, 13:48 (1:48) PM UPDATE
I thought I should share my progress. It is sometimes a lot of work for little impact, and that can sometimes be frustrating, especially when the kids comment "It looks the same, what did you do?" Having a list of the tasks and putting a big check mark in that box can help with the ho-hum things.
[x] Mitered corners on border, on the name
[x] Studied tail (see above photos), and realized after looking at Eagle photos that I was missing the rest of the fan of tail feathers!! Pulled out box of material from the project and ironed, measured, sewed and fused NEW tail feather fan - in three pieces, see below photo.
[x] Fused Eagle and her new tail feathers, and name block
[x] Satin stitched out side edge of all pieces, and then outlined the blue center body. This took a trip to the store to get more thread ( new machine, new upgraded thread). Added navy blue, gold, burgandy and red to my thread colors. First purchase of thread I stuck with the basics: black, white and a medium tan/beige. I also have two variegated threads, one an "autumn", and one a "christmas" to play with on later projects.
I also found a few You-tube videos that helped, and in future posts I will remember to write them down so I can include them!

Things I learned:
The new thing I learned, after watching several videos: when satin stitching, start with a straight stitch to anchor the thread, and end with straight stitch to the side (moving fabric to line up with new needle position). Fixed my loose threads at both ends! Yes!
Next? Borders! Add batting and backing and then auditioning quilting designs...
Crossing things off the list,
Laura
31 August, 19:16 (7:16PM) UPDATE
I finished the top! Here is the Eagle in all her glory. She is on my unfinished basement floor. She measures 39.25 " tall and 66.5" wide. I have never had a wall hanging close to this size, and would love some advice. Will a normal tube pocket do? I have curtain weights I can baste on the back when its complete to make the lower corners hang right, if needed. Has anyone used that idea before?

Here is how that fancy cutting of the striped fabric turned out in the border, with mitered corners. See my Video Library post for the link to learn how to do this.

To see the story of this project from the beginning see below.
Sincerely satisfied for this weeks progress,
Laura
The Beginning
My monster project in the works, and a UFO since 2004. My husband was in the hospital for several days in ICU, and with a one year old at home I needed a stress outlet. My vision was an Eagle wall hanging with our name held in talons, over a wide fireplace or couch. So I taped a bunch of paper together and started by drawing out templates for the wings, and then worked my way into layering on the head and body after the two wings were complete. The issue I did not foresee was needing blue sky on the top and bottom on my wing strips as I cut them out in the wedges I needed to form the wings. This became a bigger problem later when I had the body and head on, and then had the question... "How to do I get to the edge to make a border??? OOPS. So here my eagle is, not yet ready to fly. At least the cross stitch is done, now how do I attach it??


I have the top sky squared off now, so that challenge is done. Now I need help with attaching the cross stitch and making triangle talons look good on those stumpy legs, and finding my bottom edge by using "Y" seams for those missing sky pieces.
Piecing in Peace and Freedom,
Laura
28 August, 10:00 UPDATE .
After 48 hours of great feedback and ideas I've taken on the task of getting this Eagle cleaned up and ready for applique on an already squared off background. I also drew out Elita's idea of (what I would call) basket weaving loops from the Big Eagle to the Name Quilt, using loops and dowel rod. I am not sure if I will use the idea, but thought it intriguing enough to draw out and will definitely ponder on it while I get the Eagle appliqued.. What do you think?

option 1. inset the name into the bottom portion of the quilt
option 2. basket weave loops and hang the Name from the Eagle
Here the Eagle is as of 10:00 CST, head and shoulders now free of sky.

28 August, 13:00 (1:00 PM) UPDATE
My Eagle is free of the sky mess!! I would like to never seam rip like that again. Prior Planning Prevents Poor Performance. Or in this case, a corner I didn't want to sew my way out of. Taking a break to fold laundry I was looking around and noticed the picture of Mt. McKinley in Denali National Park in Alaska. We were stationed there for two years, and this picture is a favorite of ours and always hangs in the living room. So, hopefully, will the Eagle when it is finished. So taking inspiration from the matting and frame, and pulling from my stash here is what I came up with...


I pulled out a light creamy gold for the background, a striped fabric that has golds and metallic glints through out with a black edge to mimic the black framing and gold matting effect. I'm playing with the idea of trying to embroider the Name on the gold fabric. Then the cross stitch with an added "established" year would stand alone in a frame somewhere else.

Originally I was going to add a black button for the eyeball. Here is a closeup of head detail, sans button.

A better picture of the striped fabric that cut right would make a great border I think. STILL have to figure out the feet and talons.
Struggling, but moving forward
Laura
28 August, 12:00 PM UPDATE
Happy Hump Day - Wednesday! The Eagle is coming along nicely. I measured and cut out the gold background fabric. I found the time after the kids were in bed to iron and fussy cut out the borders, which will be mitered. When cutting stripes to use as borders, iron with those stripes straight - use a long ruler if need be to get the wiggles out. It will make lining up your ruler for cutting a lot easier later. Oh, and remember to add your 1/4 inch seam allowance on both sides for attaching to middle and for sewing on binding!

Here is a close up of those 1/4 inch seam allowances, and the black and light cream border.

I looked at a bunch of Eagle talon pictures online, and have a basic understanding of how I am going to construct the puffy talons. I watched several you tubes on stuffing appliques and I have my steps written down for the order of fusing, etc. Fingers crossed. I do have extra fabric, but plan on trying a sample with scraps first!

And finally I cut out a smaller border for the EMBROIDERED Name!! I designed the embroidery and then challenged my daughter to get her spelling homework done before the machine finished the 10,000+ stitches. My girl is good, she did it (I never had a doubt)! I matched the background fabric and I think it looks better than the cross stitch for this project. I'll miter these corners too, and then fuse it to background under talons.

Its so freeing to have a plan again!
Laura
31 August, 13:48 (1:48) PM UPDATE
I thought I should share my progress. It is sometimes a lot of work for little impact, and that can sometimes be frustrating, especially when the kids comment "It looks the same, what did you do?" Having a list of the tasks and putting a big check mark in that box can help with the ho-hum things.
[x] Mitered corners on border, on the name
[x] Studied tail (see above photos), and realized after looking at Eagle photos that I was missing the rest of the fan of tail feathers!! Pulled out box of material from the project and ironed, measured, sewed and fused NEW tail feather fan - in three pieces, see below photo.
[x] Fused Eagle and her new tail feathers, and name block
[x] Satin stitched out side edge of all pieces, and then outlined the blue center body. This took a trip to the store to get more thread ( new machine, new upgraded thread). Added navy blue, gold, burgandy and red to my thread colors. First purchase of thread I stuck with the basics: black, white and a medium tan/beige. I also have two variegated threads, one an "autumn", and one a "christmas" to play with on later projects.
I also found a few You-tube videos that helped, and in future posts I will remember to write them down so I can include them!

Things I learned:
The new thing I learned, after watching several videos: when satin stitching, start with a straight stitch to anchor the thread, and end with straight stitch to the side (moving fabric to line up with new needle position). Fixed my loose threads at both ends! Yes!
Next? Borders! Add batting and backing and then auditioning quilting designs...
Crossing things off the list,
Laura
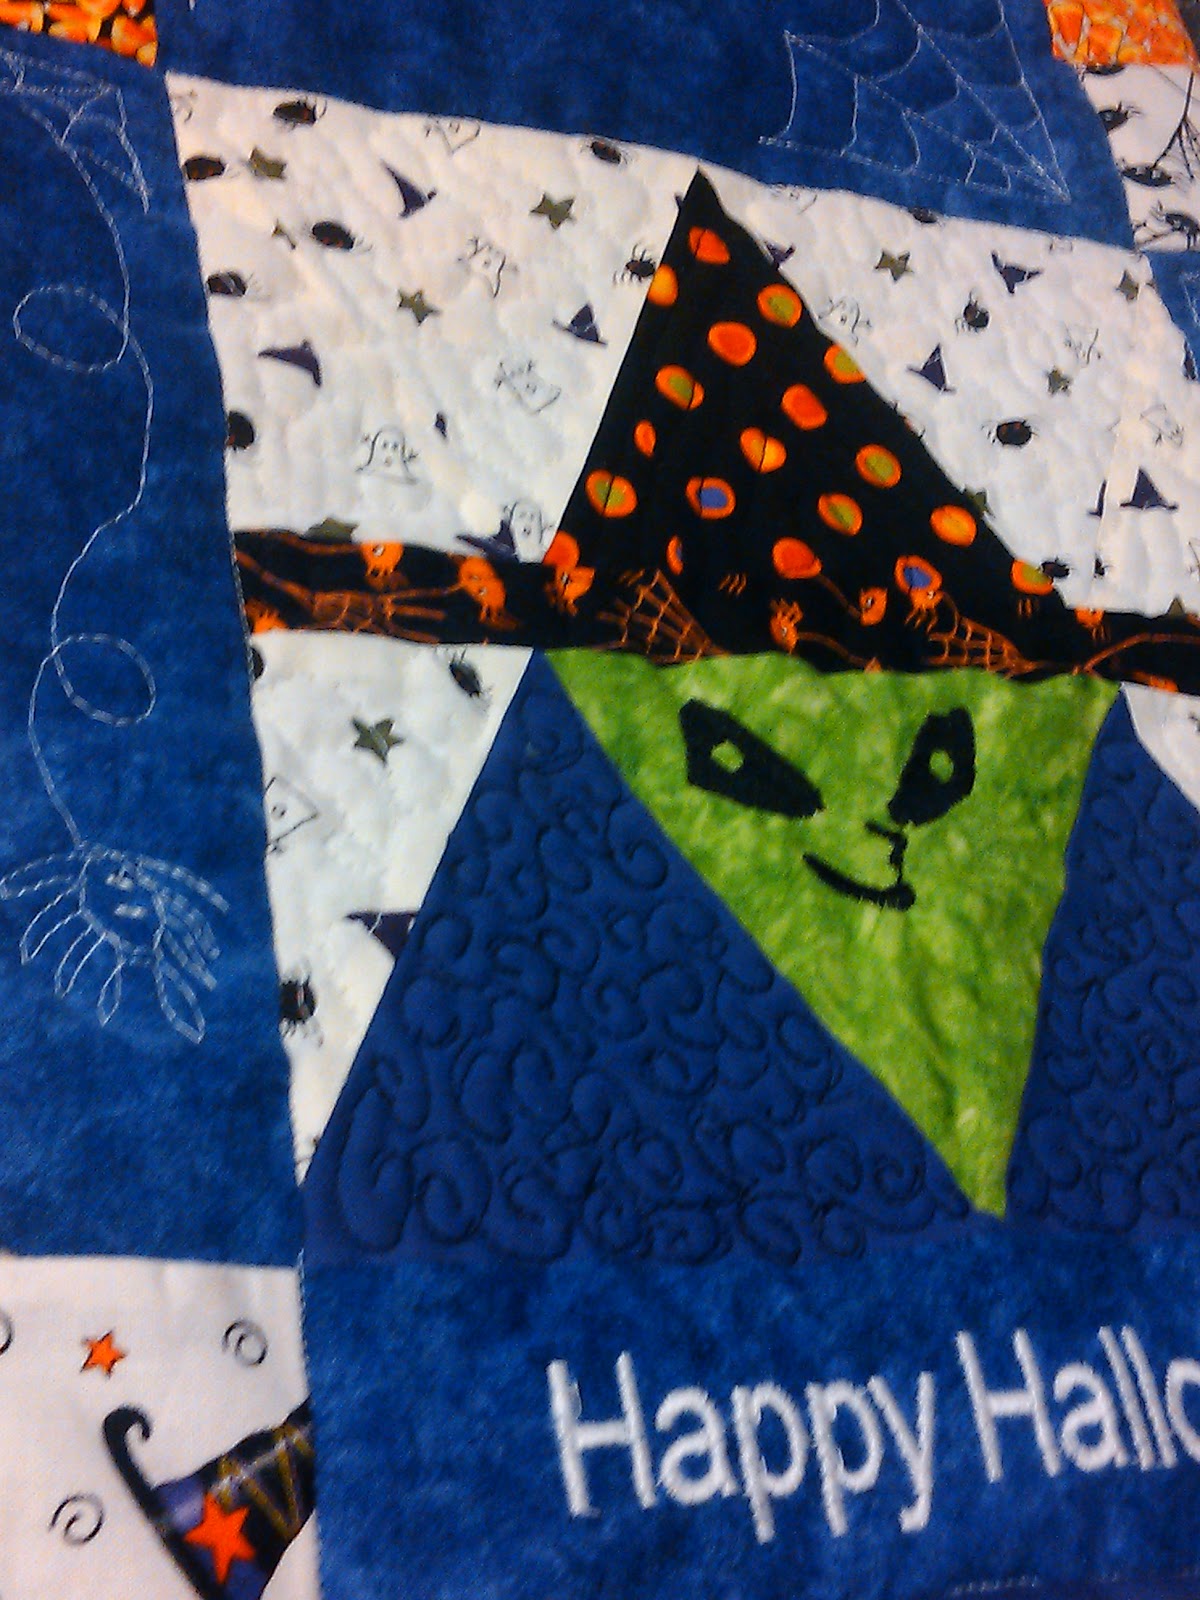
Project #1 finished! Halloween Table Runner
So, I have the machine setup and half way through the training videos I think I'm ready to actually tackle a real project. I have a stash of halloween fabrics I've been collecting for years (you might think I am joking but one salvage edge said 2000, and another said 2002!). I want to have something fun on the table for the end of October. We have birthdays on the 29th and 30th with Halloween on the 31st, so its always a festive couple of days.
I asked the girls, 1st and 2nd graders this year, what they think of when they think of Halloween? Answers: "Pumpkins! Witches!" Ok, so I googled online photos of Halloween quilt blocks, and had some graph paper handy to take down some rough sketches of what I liked.
2 pumpkin blocks, and 2 witch blocks later, with a lot of new free motion techniques thanks to Free Motion Quilt Project by Leah Day: ("curly cucumbers" for hair, stippling for cream background, changed Leahs "icicle lights" to my "dangley spiders" in the tight border by adding a little satin stitch to fill in the body and adding another set of legs to make 8, pointy elongated stipple to evoke the feel of the pumpkin sections, etc.
Hope you enjoy!


Introduction
This is a first for me, and hopefully will let me share my quilting projects and other creative ideas online in a manner that will make it easy to follow my progress.
My name is Laura S, and I am a mother of three young children 7 and under. My husband is in the military and we usually move every two years or so. Every time we move, the sewing machine has always traveled, and usually at least one storage box of fabric stash (overseas). It is always a sigh of relief at the other end to unpack and and plug in the machine. My first machine was a basic Singer I received from my grandmother circa 1965-ish. This worked great for many years with curtains, dresses, and worked for me through my first quilting classes when we were stationed in Fairbanks, Alaska. But shortly thereafter it became clear that I was probably pushing it a bit with the bigger and more frequent quilt projects. I bought another basic Singer in 2002, and that has sufficed through the years of infrequent use due to having three kids. It was great for traveling to sewing bees and Quilt Club meetings, etc. but stitching in the ditch was getting old. Taking classes with others who had computerized machines made it obvious to me that I wanted an upgrade.
In August 2012 I turned forty, and the baby is now three and the girls are in school, so more quilting time! My family bought me a Singer Futura Quartet for my birthday and I've been spending a lot of time with the 5 hours of videos, and trying to get up to speed on a computerized machine. I've found Leah Day and her Free Motion Quilting Project to be illuminating and encouraging as I work as a beginner on free motion quilting techniques. I've done a closet full of quilts with stitch in the ditch on the basic machines, and feel blessed that I can now expand into this next challenge.
So here we go, a new beginning with a new technique to master!
Happy quilting and creating,
 Laura, L2DS Designs
My name is Laura S, and I am a mother of three young children 7 and under. My husband is in the military and we usually move every two years or so. Every time we move, the sewing machine has always traveled, and usually at least one storage box of fabric stash (overseas). It is always a sigh of relief at the other end to unpack and and plug in the machine. My first machine was a basic Singer I received from my grandmother circa 1965-ish. This worked great for many years with curtains, dresses, and worked for me through my first quilting classes when we were stationed in Fairbanks, Alaska. But shortly thereafter it became clear that I was probably pushing it a bit with the bigger and more frequent quilt projects. I bought another basic Singer in 2002, and that has sufficed through the years of infrequent use due to having three kids. It was great for traveling to sewing bees and Quilt Club meetings, etc. but stitching in the ditch was getting old. Taking classes with others who had computerized machines made it obvious to me that I wanted an upgrade.
In August 2012 I turned forty, and the baby is now three and the girls are in school, so more quilting time! My family bought me a Singer Futura Quartet for my birthday and I've been spending a lot of time with the 5 hours of videos, and trying to get up to speed on a computerized machine. I've found Leah Day and her Free Motion Quilting Project to be illuminating and encouraging as I work as a beginner on free motion quilting techniques. I've done a closet full of quilts with stitch in the ditch on the basic machines, and feel blessed that I can now expand into this next challenge.
So here we go, a new beginning with a new technique to master!
Happy quilting and creating,
Subscribe to:
Comments (Atom)