Leah Day on http://freemotionquilting.blogspot.com/ has great tips and suggestions on this "Thursdays Question" post, about tables for sewing machines, and several blogs on material storage, organizing space, etc. I can totally dream of using those insights in several more years. But today, I have limited space.
So how can you organize to get the best space use, out of a tiny place? Even a closet?
I have several quick and cheap ways to make the most of your closet.
1. Photo Boxes for project organization:
Do you have projects where material scraps and remaining yardage need to be put away quick (for say those holiday guests arriving)? I have a collection of photo boxes. They are labeled on the front tag as to the title of the quilt. Or in some cases by theme, example "Autumn". If I didn't organize my UFO (unfinished objects) or WIP (works in progress) patterns and material in this way, I would have to look through a pile of stash every time I wanted to get started, or worse, a random plastic shopping bag from the last trip for fabric. My Eagle UFO (see EAGLE Post) has a box, thank goodness! I was able to open the box and pull out the exact material I needed, see the original sketches and plan idea, and this box was started in 2004! These boxes are easy to stack and you can usually go three or four high on the closet shelf. And they can't get too heavy, so they are easy to get down.
Here is my Eagle photo box full of the material I originally purchased for this project. And below you can see my collection of photo boxes, all labeled and stack-able. Easy to get too. Yes, I now have a basement, and chose to purchase this stainless steel shelf to hold the pounds of supplies. But these boxes are perfect for that shelf closet - that is where they have lived for the majority of their life.
2. Shelves in end of closet space.
Do you have a wide closet and deep ends, that extend more than a couple of inches past the door jamb? If so put that hard to reach space to the best use. Find the studs, mark the space for some end shelves. Use the metal shelving brackets (closet section on home improvement store) if you want them adjustable. Measure the depth of the closet for the width of your shelves, and cut some plywood to match. Sand and Paint and you have a small shelving unit.
3. Quilting library
I have my favorite magazines and quilt books in plastic magazine holders. There are three clear and one black on the third shelf in the above photo. I prefer the clear so you can see the sides of the books better. All the spines are out and its the best way to get organized for that growing library on your new shelves!
4. Fabric stash
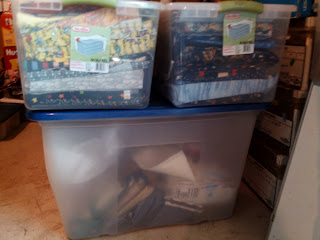
I do not have a large stash, but overtime you do build up large (1/3 yard or more? you make the call) material cuts, left over from previous projects that you want to store with the rest of your stash. Those cuts are big enough to support a new project, and you never know when you might need them. So... I have two storage bins for fabric. I have my material folded in such a way that I can get three different stacks of fabric in each tote. Before we moved, I had the girls each organize a tote (things get mixed up and its worth the effort to rummage through every once in a while). Stacks for three different colors, and from light to dark. Girls had a blast. I was rainbow organized again!
First tote: Red / Pink / Yellows, White, Oranges, Cream.
Second tote: Greens / Purples, Brown and Black / Blue.
5. Batting and fluffy stuff
I have one giant tote that holds the batting, poly-fil, and anything else fluffy or light. Rolls of fusible webbing, stabilizer, etc will also fit in this box.
6. Designate one side of the closet for stacking. You can see the colors if you use clear totes. The totes can get heavy, but they are waist level in this photo, and I can get to both stash totes easily.
7. Designate the other side of the closet for hanging. There is always that quilt top or back you just ironed, that needs to be hung. Also, small quilts waiting to be bound can hang, etc. Here I have a picture of an adjustable shower curtain rod hanging underneath the stair space. But in the closet space I used a extended hanging bar, that hung from the regular closet bar. This doubles your hanging space!
Finally, if you use the room your closet is in for your sewing, hang the iron and ironing board on the inside of the door using one of these wonderful caddys!
And there you have it, a quilting closet. A lot can fit in a small space, I've done it! So can you. Good luck!
Laura


Great ideas!
ReplyDelete